
Archery, Arrows & Arrow Flight: Recurve Bow Tuning
This web page is for serious archers who would like to know more about matching arrows to their bow & fine tuning.
For a general book try the Archer Reference web site and download the PDF file (68 pages).
This page has been significantly updated in Spring 2020... while under Covid-19 lock down.
The Cast of an Arrow
When an archer shoots an arrow from a bow they experience the arrow's cast, essentially the arrow's speed and distance. The greater the cast – the greater an arrow's speed/distance/momentum – the better.
Light (low mass) arrows spend less time in the air, take a more direct route the the target, are less effected by wind and atmospheric conditions. However for a given cross sectional area, a slightly heavier arrow will punch through the air better at the expense of sight marks at longer distances. It is a balance.
Easton X10 arrows are heavier than Easton ACE arrows. Archers shooting WA1440 rounds which includes the 90 metre distance often prefer ACEs due to their better sight mark. Archers shooting 70 metres exclusively, may prefer X10s.
A bow provides an arrow with momentum, where momentum (wikipedia) is defined as mass x velocity... or weight times speed.
However, a bow can only provide so much momentum to an arrow, and arrows should be of "optimum mass" for a given design of bow, and vice versa.
For example, an arrow of too low a mass – say 1 gram – will have an arrow speed of close to the "dry shot" speed of a bow. The arrow will travel at close to the theoretical maximum for given design of bow, however, little of the energy stored in a bow of current design would be transferred to the momentum of a feather weight arrow. There would be a great deal of noise, and the bow would soon break.
Conversely, a fully drawn bow will very efficiently transfer its energy to a 1 kilogram arrow. However, arrow velocity will be low, and the arrow will travel a few metres.
We must trust when buying a modern recurve bow that it has been designed to efficiently shoot modern, low mass carbon arrows. This trust is helped by the knowledge that the world's major recurve bow maker and standard setter, Hoyt, is owned by the same people that own the major arrow manufacturer Easton Archery and we can assume that the engineers from the two companies talk to each other!
Arrow Construction
Arrows are made of rods or tubes of stiff, low density material: wood, fibre glass, aluminium, carbon fibre, or a composite of carbon fibre wrapped around aluminium tubing.
Arrows must be 'quite stiff', but crucially they must retain some bend: a perfectly stiff arrow cannot be shot from a bow. Indeed, the correct degree of arrow stiffness is one of the keys to successful archery, as will become apparent.
- Arrows usually have a tubular shaft because, for a given mass of material, tubes are stiffer than solid rods.
- For a given mass of material, larger diameter tubes with thin walls are stiffer, but they are also mechanically weaker than narrow thick walled tubes, so there is a trade off.
- Carbon is stiffer and lighter than aluminium, which means that an arrow's overall diameter can be thinner (so more aerodynamic) and the arrow lighter (so faster) for a given stiffness.
- For the last 30 or so years, the optimum design for a light, stiff, durable arrow has been carbon fibre bonded over aluminium tubing. (This may be changing with the development of Carbon Express and Skylon arrows.)
- Easton ACE and X10 arrows are carbon wrapped aluminium, but they are also slightly "barrelled" so that the wrap of carbon is (slightly) thicker in the middle than the ends... like a barrel. However, although this is currently the best design, it is also the most expensive option. Interestingly, in the middle ages, the best longbow arrows made of wood were also barrelled.
An arrow has a massive pile (point) made of high density metal (iron or tungsten), a nock which fits onto the bow string, and fletchings or vanes (UK/USA) that add drag at the rear of the arrow.
An arrow has a centre of mass (centre of gravity or balance point) and a centre of drag:
The centre of drag MUST be behind the centre of mass, and the further behind the better, otherwise the arrow will be inherently unstable in flight. Indeed, if the centre of drag is in front of the centre of mass the arrow will have a tendency to turn round and fly "backwards".
Large fletchings and a heavy pile will increase the distance between the centre of mass and the centre of drag and make the arrow fly better, but at the expense of cast (arrow speed). So there is a trade off.
For a given mass of arrow + pile, a lower mass shaft will increase the distance between the centre of mass and the centre of drag.
Tournament archers often use different arrows for indoor and outdoor use.
- Indoors over short distances (18 - 25 metres) where line cutters count, large diameter aluminium tubes with big fletchings are used.
- Outdoors over longer distances (30 - 90 metres) where arrow speed in paramount, aluminium-carbon composite arrows with small fletchings are employed.
- Unfletched arrows can be usefully used when tuning a bow because the "smoothing" effect of the fletchings is absent. Put another way, if a bow can be made to shoot unfletched arrows well, it will shoot fletched arrows even better! A well tuned – and well shot – bow is able to group fletched and unfletched arrows at 50 yards/metres. (I say "well shot" because unfletched arrows are hypercritical and will accentuate poor technique).
The Bendable Arrow
Consider a 40lb bow, with a bracing height of 9 inches shooting a 28in arrow.
The initial force on the arrow builds to 40lb, but as the string and arrow move forward the force on the arrow decreases, until after 19 inches of acceleration (28in – 9in) the arrow leaves the string/bow.
During the shot, the arrow is pushed by the draw force of the bow applied to the nock end of the arrow. The high mass part of the arrow is at the front, and separated from the nock by the bendable shaft of the arrow. As a result, the arrow dynamically bends:

The term "dynamic bend" or "dynamic spine" is used because the degree of bending is difficult – if not impossible – to determine without high speed photography.
To measure the static spine, an arrow shaft is supported at two points, and a weight is suspended from the middle. The static spine is a measure of the deflection a shaft.
The Easton arrow chart states use of a 28 inch span and a 1.94 pound (880 gram) weight. Deflection is measured in inches. (A 29 inch bare shaft, without pile or nock is used for measurement.)
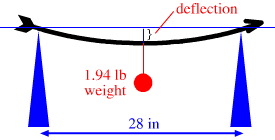
The degree of static bend of an arrow, is called the "spine" of the arrow.
A '520' arrow such as the ACE 520 will deflect 0.520 inch.
The degree of static deflection gives a good indication of the dynamic bend of an arrow – stiffer arrows bend less – but the spine does not give a measure of the actual degree of bending when an arrow is shot from a bow.
Note: The situation is VERY different with compound bows where, as the arrow accelerates the force on the arrow increases. In engineering terms this design is far more efficient for several reasons and accounts for the greater arrow speed from a compound bow. However, the discussion on this page is limited to recurve bows.
Simplified Arrow Dynamics: The "One Bend" Archer's Paradox
The term Archer's Paradox was coined in the mid 1930s by Dr. Robert P. Elmer to 'explain' why an arrow would hit a target when, from all appearances, it should strike to the left.
The archer's paradox is most clearly observed with traditional longbows that do not have a cut away in the riser for the arrow rest.
When shooting a traditional longbow, the arrow must point significantly to the left (for a right handed archer), yet a well shot arrow will shoot straight with respect to the centre shot line of the bow.
The "archer's paradox" is that the arrow shoots straight, even though it starts off pointing outwards.

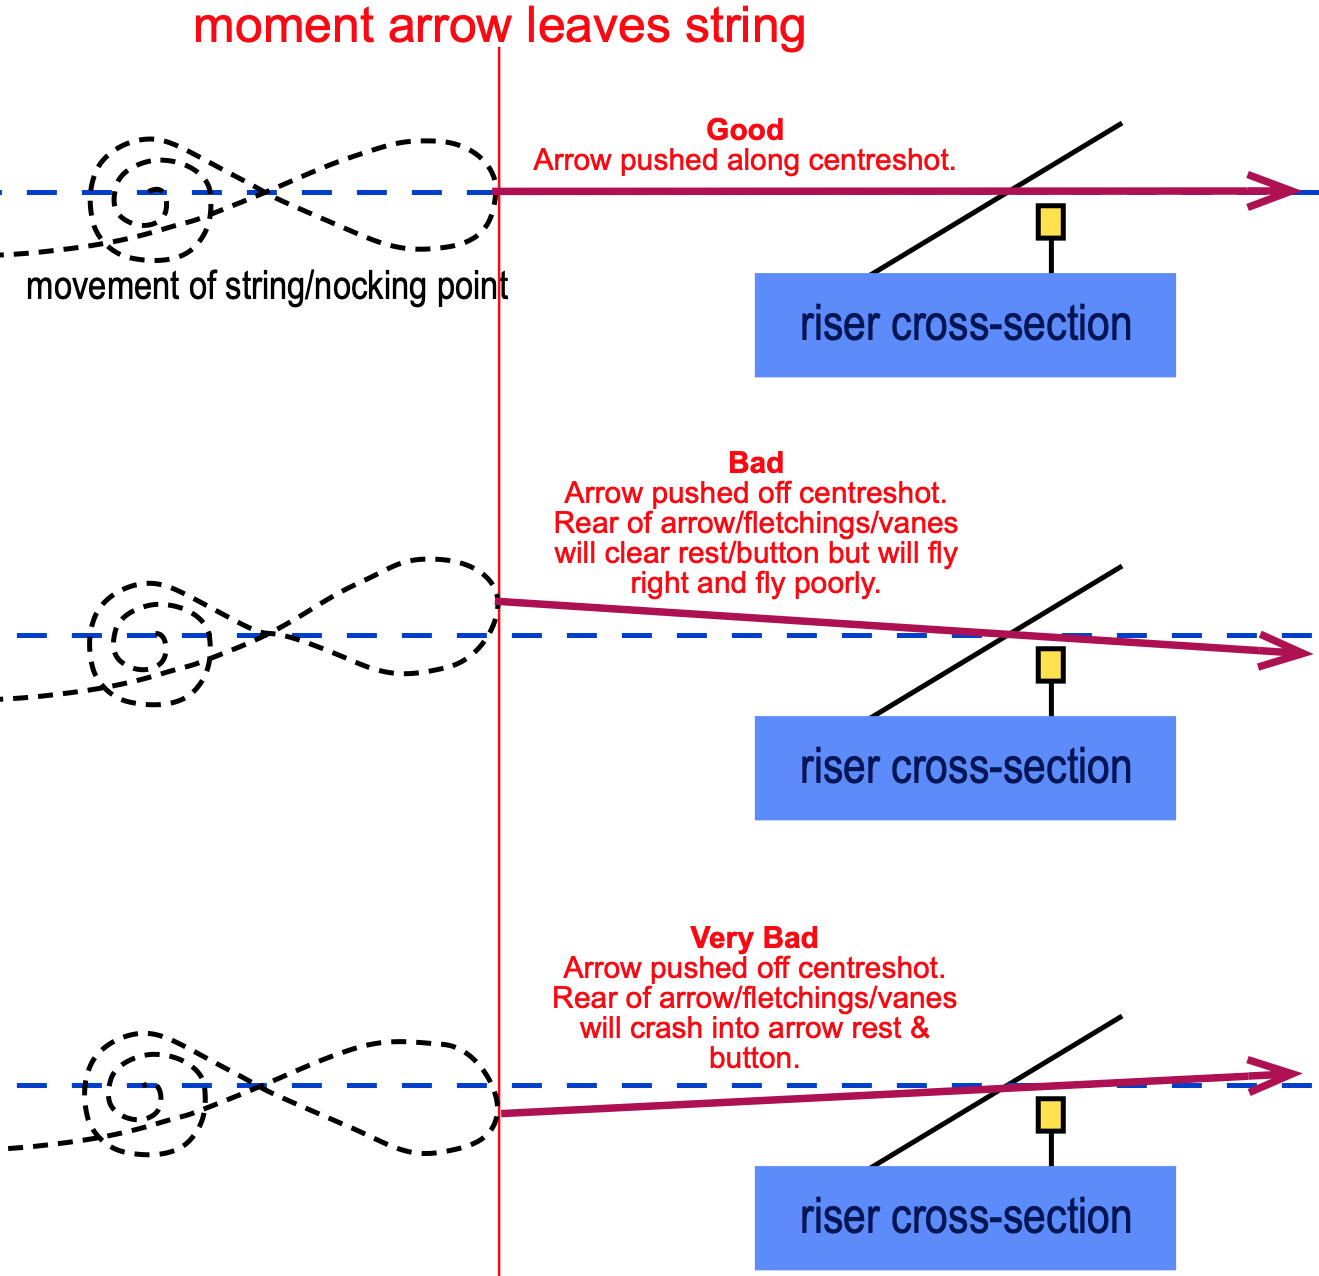
The diagram below shows a simplified "one bend" explanation of the archer's paradox, and this is the explanation I give to beginners.
I say, "the string pushes the arrow which bends around the bow":
TOP DOWN VIEW OF ARROW, STRING & BOW
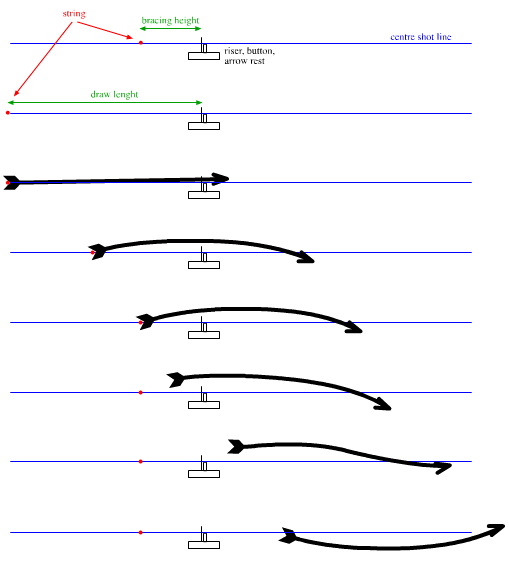
The crucial point is that the arrow must be of the correct spine so that it dynamically bends around the bow, the fletchings/vanes do not touch the riser or arrow rest and the arrow flies cleanly to the target.
If an arrow of the wrong spine is shot, the fletchings, nock or arrow shaft will hit the bow. Indeed, consistently damaged fletchings/vanes are always an indication of poor arrow clearance.
Thus, the archer, bow and arrows must be matched with each other.
Real Arrow Flight
There are several excellent – if rather small – high speed video clips showing arrow flight on the Werner Beiter web site, here. These clips show the physics to be rather more involved than indicated above.
The analysis & discussion given here is based upon the Beiter video clip.
- Take a good, long look at the larger video clip on YouTube.
- View it several times, and then step through the clip one-frame-at-a-time using the lower right hand side controls.
- The arrow flight is highly involved and it is necessary to look at several things at once: the nock, pile and the degree of bend, how far the shot has proceeded, where the string is laterally, and exactly how the rear of the arrow clears the rest/button.
- I have captured 7 frames from the video:
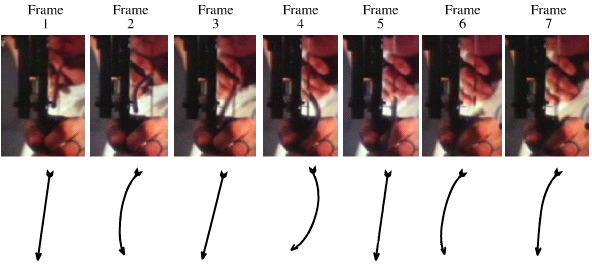
Assuming a 28 inch arrow with a 9 inch bracing height, from the frames above:
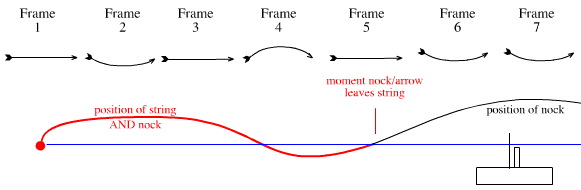
- 0 inches: The moment the shot starts.
- 3 inches: Fingers push the string out, and the arrow bends in.
- 7 inches: The arrow straightens. The string is still out.
- 12 inches: The arrow bends out. The string is in.
- 19 inches: The exact moment the arrow leaves the string. The arrow is straight and the string is central.
- 26 inches: The nock end of the arrow "flicks out" and clears the arrow rest by a wide margin.
- 31 inches: The arrow is clear of the bow, but is still vibrating in and out.
- This is perfect and what we are trying to achieve: clearance. No part of the arrow should touch as it passes the bow.
YouTube Video Slow-Motion Clips Showing Arrow Dynamics
You may want to go to the YouTube setting and slow these down as much as possible, 0.25 speed.
1: "This is the best angle to view arrow flight." [I have been informed that this is possibly a video GB archer Allison Williamson]:
2: Park, Sung-Hyun – the first (and one of only two) woman to shoot 1400 on a WA1440 – on the Practice Field at the 2007 World Target Championships. Look at how the fletchings/vanes completely clear the arrow rest. This is the ideal tuning:
3: Unknown archer. Look how the fletchings/vanes catch the arrow rest. There will be marks on the fletchings, and they may become torn. This is what fine tuning and hyper-fine tuning attempts to avoid:
4: Archers Paradox - Short Version by Daniel Yononindo:
5: The Archer's Paradox in SLOW MOTION - from Smarter Every Day:
Arrow Selection
First decide upon a make and grade of arrow: Beman, Easton XX75, X7, ACE, etc. Choice will probably be influenced by price. My advice would be this:
If you are missing the target once a dozen, get cheaper arrows aluminium arrows: Jazz or XX75s. If you are an 1100+ FITA archer, you will want the best, lightest, thinnest and fastest arrows possible. (For the indoor season a tournament archer may choose fat arrows.) If you are in between, then buy in between.
Think long and hard, then choose. You MUST have faith in your choice! Like any sport, archery is in large part about belief. You must know that you have the right arrows. |
If serious, buy a dozen (12) or more matched arrows, don't mess about with 8. Cut all the arrows to length, and fletch 10 of them. If unsure, cut the arrows long as they can always be shortened.
Decide upon a clicker position for the cut length of arrow. Warning, it is very easy – even for an experienced archer [writing from experience] – to shoot to the wrong clicker position/arrow length, and therefore it is a good idea to spend some time making sure that the clicker position is exactly right before cutting arrows and attempting to tune a bow.
Just because the clicker is very easy to move, it does does NOT mean that it is a good idea to fiddle with it!
On the contrary, decide upon an arrow length and associated clicker position and stick with it.
If you move the clicker more than a 1/4 inch it will be necessary to recheck the tuning. It will certainly it will be necessary to re-tune the bow if a set of arrows is shortened.
However, occasionally radically alter your clicker position and then re-adjust position back to its/your natural position... just to check the clicker is where it should be.
Easton Arrow Selection Charts can be found at the bottom of this page.
Bow Tuning
There are at least 12 modes of movement associated with arrow flight (thanks to Martin Speakman, national coach for the diagram):
Arrow flight is complex, where the term "complex" is used in a technical sense. There is a page on complexity theory – with lots of pretty pictures – here. The page is called Chemistry & Complexity, but the first part is a general introduction to complexity theory & systems thinking and it may be of interest to archers.
Tuning is concerned with getting an arrow to fly to the target as cleanly as possible.
- Arrow should not wobble up-and-down or side-to-side during flight... too much...
- The arrow should fly straight to the target with-respect-to-the-bow such that there should be no lateral sight adjustment between 18m indoors and 100yd outside on a still day, this is called "centre shot".
- The fletchings (vanes) at the back of the arrow should clear the arrow rest. Damaged fletchings are a clear indication of poor arrow clearance.
- The bow should be as quiet as possible. A quiet bow is a tuned bow and it putting maximum energy into the arrow. A noisy bow is wasting energy.
Bow tuning is closely related to how well an archer shoots. Good archers are likely to have a strong and consistent shooting technique and will befit most from tuning.
Archers learning the sport will likely have an inconsistent loose. The forward or soft loose – a common problem – will make an arrow appear too stiff for the bow and so it will fly badly.
It is not possible to tune-out bad technique, but it is possible to leverage good technique with tuning.
Tuning 1: Nocking Point
On a well designed and well made bow, the upper limb is slightly stronger than the lower limb. The effect is that when shot the arrow will lift up and away from the arrow rest, so helping clearance. It is necessary to position the nocking point on the string a few mm above horizontal so the arrow clearance and arrow flight are coordinated.
Nocking point is largely determined by basic technique, such as how many fingers are used. Once set, does not change much.
To determine the nocking point position, I suggest and use the "walk-back" method.
- Put up an old/softish boss with no face. Foam bosses are best. Use tape to put two horizontal lines on the boss: one at eye height and one and chin/arrow height. The idea is to aim at the top "eye" line, and have the arrow hit the lower "arrow" line. This method means the arrow leaves the bow exactly horizontally.
- Stand ridiculously close to the target: a 30 in long rod should be close to touching the boss. Adjust the sight so that when aiming at the top "eye" line the arrow hits the bottom "arrow" line. Get a friend/coach to make sure the arrow is exactly horizontal at the moment of loose.
- Shoot an arrow, take a pace back, shoot another and repeat until about 15 paces back. Aim along the line, left-to-right, so the arrows hit in a line.
There is a critical distance at about 5 to 8 metres. If the arrow hits fetching end "up", the nocking point needs to be lowered, and if it hits tail end down, the nocking point needs to be raised.
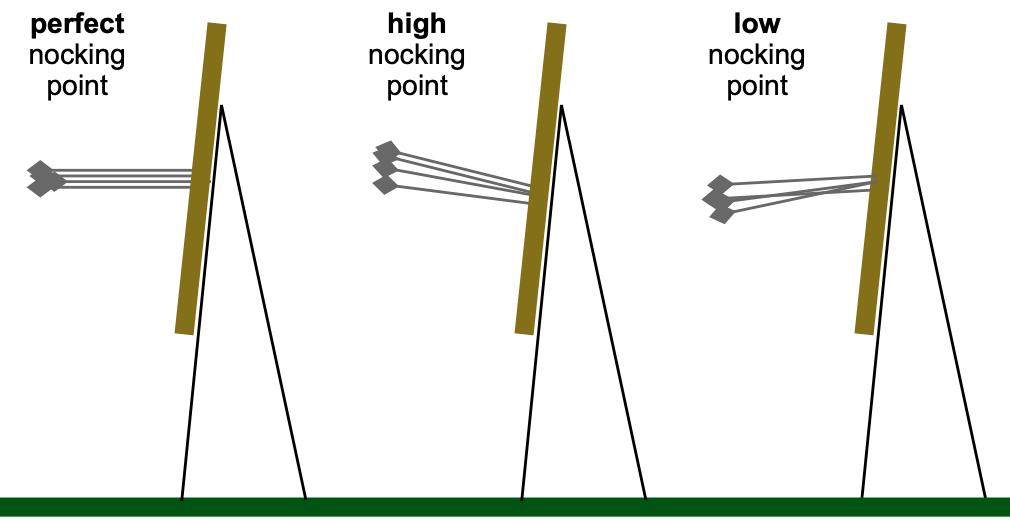
- Once satisfied with the nocking point, repeat with unfletched arrows. These are far more critical than fletched arrows. It is quite possible to get unfletched arrows all hitting horizontally while walking back.
- Make the nocking point on the string permanent.
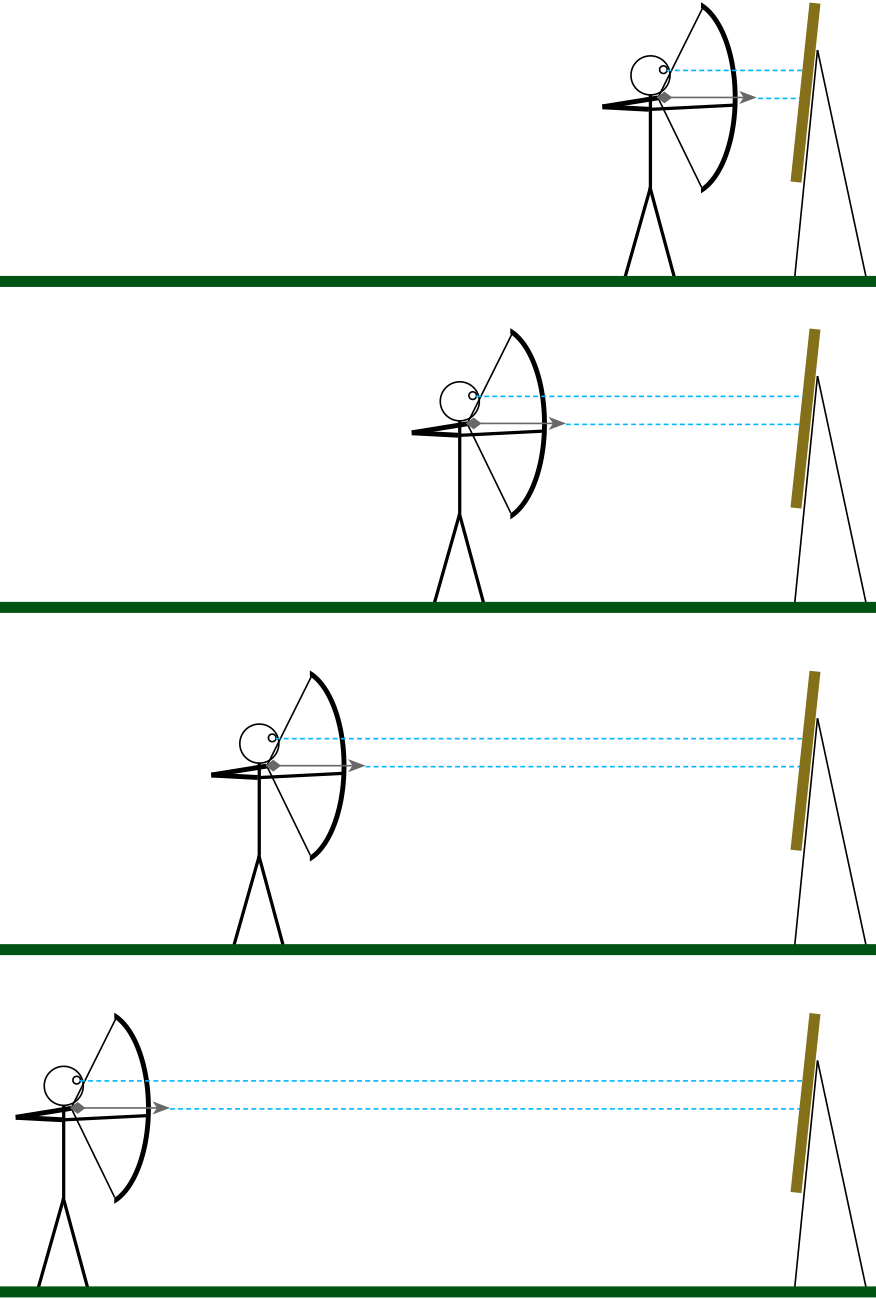
Tuning 2: Centre Shot
When centre shot is set correctly, the arrow will travel "along the line of the bow". The advantage of having correct centre shot is that there will be no lateral sight adjustment between 15 and 90 metres: the arrow will be shooting straight and the maximum amount of energy will transfer to the arrow improving cast.
- To check the centre shot you will need a friend/coach and a very still, windless day.
- Put a target at about 40 yards/metres.
- Shoot a couple of dozen arrows first to get warmed up. Do not rush this procedure. Shoot as normal and adjust the sight so that arrows are grouping in the middle.
- Get the friend/coach to stand directly behind and above you. They should be checking that at the moment of loose the string alignment down the bow, and they need to see the string and bow are aligned with the gold.
- Friend/coach: Check that the string lines up with the centre of the bow AND the centre of the target AND check to see that the arrow flies along the same line.
- It may be necessary to stand on a chair.
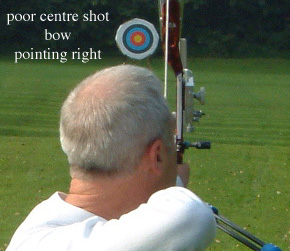
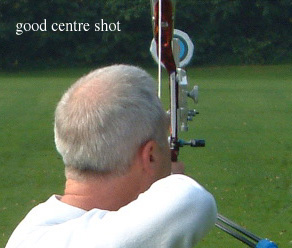
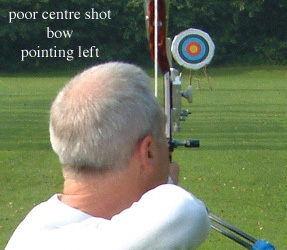
It is much easier to see when centre shot is wrong, because when correct the archer's head and bow can block out the view of the target. Get above the archer.
The photos above were "faked" with the archer deliberately aiming off, but this is exactly what poor centre shot looks like. Walk along a shooting line on a still day looking for set-ups with... and without... good centre shot.
Centre shot is corrected by moving the pressure button and/or adjusting the stiffness of the pressure button.
- If the bow centre line is pointing left (for a R/H archer) move the button out, make the spring stiffer or both.
- If the bow centre line is pointing right, move the button in, make the spring weaker or do a bit of both.
At this point a good question is: "Is it better to move the button position or adjust the spring stiffness?" (This is fine tuning. Get the overall centre shot right first.)
Another – and even better – way to check & correct centre shot:
On a still, totally windless day, put up a boss/target at 70 metres and shoot a few ends to get warmed up, set the sight and get a good "string picture" (below).
Walk up to the target, until about 15 - 20 metres away. Move the sight up (obviously) to your indoor mark and shoot a few arrows using exactly the same string picture. (It may be a good idea to put a small 40 cm face to one side of the 122 cm face, and shoot at that.) Are the arrows still flying straight to the gold? Do you need to move the sight to the left or the right?
If the arrows are still hitting straight, the centre shot is correct. But, if your sight needs to be moved left or right, your centre shot is wrong.
So:
- Move the sight left or right until the arrows are hitting the gold at 15 - 20m.
- Go back to 70 metres, and move the sight down to the 70 metre mark (obviously), but do not change the left or right sight.
- Shoot a few arrows. However, this time correct any left-right bias by moving the button in or out, NOT the sight.
- Go back to 15 - 20 and check that.
- Check at 70.
- Repeat at 20 and 70.
- When there is no lateral adjustment between short (15 – 20) & long (70 – 90) distances your centre shot is correct.
Once the bow is has the 'centre shot' fixed, the arrow will be exiting the bow straight. This means there will be no left-right sight adjustment necessary between 20y and 100y (18m & 90m)
Now, if you move the pin to the centre of the bow and sight with the string exactly down the middle of of sight pin (not easy to do) the bow will shoot straight. (This can actually be a bit of a mental and physical strain.)
Assuming this is the case, you can now move the string to the right and the pin to the left... and the movement will be the same (as pictured by the archer):
However, there is one proviso: String Alignment/String Picture
- If an archer aligns their string with the sight pin, as the sight pin moves in and out [due to wind or poor centre shot] the string alignment will also change. This may have technique implications as an archer may feel less aligned to the target.
- If an archer aligns their string with the riser of the bow, as the sight moves in and out [due to wind or poor centre shot] the string alignment will NOT change.
This may seem like a minor point. But, my personal technique is to align the string with the riser. When I do try to align with the pin I become very aware of my whole body stance.
Tuning 3: Bracing Height
A bow has a static bracing height – the distance measured with a bracing height gauge – and a "dynamic bracing height", which is the distance between the string and the throat of the bow at the exact moment the arrow leaves the string, where the movement of the string is rather complex:

The dynamic bracing height can only be determined by high speed photography. Static bracing height is a proxy for dynamic bracing height in the same way that static spine is a proxy for the dynamic degree of bend of an arrow.
Kevin Salvini, a mechanical engineer, contacted me (in May 2025) saying:
"Upon reviewing the high speed video I think there is a small correction that needs to be made to the diagram above, about the exact moment of arrow dynamic release/brace height.
"The diagram of dynamic brace height should show the same nock/string path with the arrow releasing as the string sweeps from being close to the riser towards being farther away from the riser.
"Below is a modified diagram of what I think is happening. (Step through the frames at 0:29 in this video for an example.) After passing the static brace height, the nock drags the string with it until the string pulls back hard enough to snap out of the nock back towards the archer. In the current diagram the nock sweeps through center a third time at release, but the slow motion video shows the nock only sweeps through twice."

The modified diagram, above, is better. Thanks Kevin!
Bracing height influences/controls two aspects of bow tuning:
Firstly, the timing of how the arrow bends around the riser, arrow rest & button.
Look again at the first three videos above. In the first two, the fletchings/vanes clear the rest but in the third the fletchings hit the arrow rest. It may be possible to fix the timing of how the arrow bends around the bow by changing the bracing height.
Secondly, the arrow should leave the string while the string is along the line of the centre shot, or the string will impart some unwanted lateral forces to the nock end of the arrow and the arrow flight will be very poor. This is why a badly shot arrow flies so badly: a forward loose, for example, will mean that the arrow is far too stiff and it will leave the string at the wrong moment.
The design of the bow is VERY important here. The limb tips (confusingly also called the limb nocks) should move in a perfect arc through the shot, and not twist from side to side... but they will to some extent. This is because the arrow flex – seen in the videos – will causes the limbs to flex.
The effect is minimised with a longer bow: the English Longbow; a 70" recurve bow over a 66" bow, etc.
The flat (thin & wide) limbs of all modern recurve bows are designed to maximise torsional rigidity and minimise flex. [Short bows, like the currently popular horse bows, twist in the hand like a greased pig, in my experience.]
Limb flex means that the arrow may not leave string while it is on the line of centre shot. Should this be the case, there will be a lateral torque applied to the arrow, and the flight will be adversely effected: the arrow will 'fish-tail' to the target and it will be very difficult or impossible to set the centre shot correctly.
The timing of how the arrow leaves the string can be fine tuned by changing the bracing height.
Modern recurve bows have a guide bracing height range of 8 – 9 1/2 inches or so. It depends on bow length and manufacturer. Check the bracing height range for your bow.
Please, at the very least, always shoot your bow to the same bracing height! This should be checked every time a bow is strung.
To determine the correct bracing height for your bow with your arrows:
- First, you will need a very long string, one that can be untwisted to give a very low bracing height (7.5 inches).
- Shoot a couple of dozen arrows to get warmed up.
- Twist up the string to the max to the bracing height for the bow, and add a 1/4 inch more.
- Wax the string. Give the string a good hard wax, and then the rub the string with a cloth really, really, really hard until hot! – melt that wax in.
- Shoot three arrows. Listen to the bow. Measure the bracing height.
- Unbrace the bow, take half a dozen twists out, and shoot three arrows. Listen to the bow. Measure the bracing height.
- Unbrace the bow, take half a dozen twists out, and shoot three arrows. Listen to the bow. Measure the bracing height.
- Unbrace the bow, take half a dozen twists out, and shoot three arrows. Listen to the bow. Measure the bracing height.
- Unbrace the bow, take half a dozen twists out, and shoot three arrows. Listen to the bow. Measure the bracing height.
- Unbrace the bow, take half a dozen twists out, and shoot three arrows. Listen to the bow. Measure the bracing height.
- Unbrace the bow,
take half a dozen twists out, and shoot three arrows. Listen to the
bow. Measure the bracing height.
- Until a 1/4 inch
below the lowest recommended bracing height, and shoot three arrows. Listen to the bow. Measure the bracing height.
- At some bracing heights the bow may made a horrid cracking sound, but there should be one bracing height where the bow makes a satisfying dooowwww-ing noise. This is your bracing height for your bow.
- Unbrace the bow,
twist the string back the satisfying doww-ing noise bracing height, re-wax, and shoot three arrows. Listen to the bow. Measure the bracing height.
- Now go through
the same procedure, this time from low to high bracing heights, checking the sound and feel of the bow, above and
below your bracing height.
- Continue... for the rest of your time in archery.
However, be aware a higher bracing height will usually be quieter than a lower bracing height, but the bow will be slower (the arrows will have less cast). It is a balance. Also, heavier arrows will be quieter than light arrows.
The correct bracing height is a sweet spot. The bow sings. It enjoys being shot.
Also, the the correct bracing height for the bow nows not necessarily mean the arrows are correctly marched to the bow.
Tuning 4: The Button
The button has two variables:
- position
- spring strength
Take a look at frame 2 of the shot sequence analysed above:
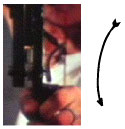
At this moment, the arrow is clearly pressing against the button.
- The idea of the button is that it absorbs some of the of the lateral pressure so making the arrow appear to be slightly less stiff for clearance purposes.
- Thus, the spring can be used to "tune-in" a slightly stiff arrow.
- However, there is a balance because if the spring is softened the centre shot will change. It is a balance.
- Check using unfletched arrows. These will accentuate an incorrect centre shot and poor button adjustment.
The author of this page holds that much tosh is spoken & written about bow tuning using the ubiquitous pressure button. At a recent (early 2009) Lancashire county squad training session, Richard Priestman – winner of two Olympic medals – was checking button pressure and was only looking for a 'reasonable resistance'. He then stated that arrow spine, bow weight and arrow point weight were far more important than button pressure which had little impact or influence of arrow flight. We could not agree more: Nobody has ever been able to explain to this author how a pressure button can influence the physics of the arrow as completely as claimed! Indeed, look at the slow-motion videos above. Can you see the button moving at all? (I can't, and I looked very hard, viewing videos one frame at a time.) |
Back To The Drawing Board: Time To Invest Some Money
You are shooting well and getting good scores but you feel results could be a bit better, when you notice that one of your fletchings has scuff marks on it...
- When you look closely, you realise that the same fletchings on all your arrows have identical scuff marks.
- Your arrows are not clearing the bow handle and/or arrow rest and you need to hyper fine tune your arrows and bow.
- If you are using one of the new super light weight magnetic arrow rests, you may be hitting the arrow rest, but do not realise it. Put lipstick all over the arrow rest, shoot, and check to see if there is lip stick on the fletchings/vanes to check for clearance.
There are several things to alter:
Arrow Length
For a given spine, a shorter arrow is stiffer than a longer arrow. Therefore shortening an arrow will stiffen it. (Tip: ACE & X10 arrows, being barrelled, can be significantly stiffened by taking length off both the front and back of the arrow.)
Buy a set of slightly stiff arrows fletch three arrows, but cut them very long. Shoot the arrows, then remove the piles, cut 1/4 inch or 1 cm off the shafts, put piles back in and shoot again. Repeat.
The UK national squad centre at Lilleshall has an arrow library and high speed camera equipment to help with arrow selection/choice. (I have been told that all the men's arrows have 120 grain points.)
It is not uncommon to see archers at international events (on YouTube) with very long arrows and clickers on extensions. My guess is that these archers have had problems getting an arrow to match, and have decided to shoot a longer matched arrow rather than a shorter ('correct' length) but unmatched arrow. An over long arrow will be heavier, slower and more influenced by the wind.
Point Weight
A heavy point/pile will make an arrow bend more and a lighter point/pile will make the arrow stiffer. From the Quicks web site: "Shafts are noticeably affected by changing the point weight: a heavier point effectively weaken arrow and a lighter point means a stiffer effective arrow."
Most top archers generally prefer a heavy point weight (120 grain). These heavy points require a stiffer (and therefore heavier) arrow shaft. The result is a heavier arrow, and this may cause problems (for men) with 90m/100y sight marks, but there should be little problem with 70m.
Top archers also generally shoot heavier poundage bows, >50lbs, so they can easily shoot heavier arrows.
Variable Tiller
Most modern bows have adjustable bow weight, say between 38–42 pounds. The heavier draw weight will need a stiffer arrow. Thus, if an arrow is too stiff the the bow weight can be increased to tune it in.
However, this is actually the wrong order. The draw weight should match the archer and the arrows should be made to match the archer + bow. It is probably not a good idea, IMHO, to try and tune arrows in by changing bow weight.
Differential Variable Tiller
Altering one limb more than the other means that it is possible change and/or fine-tune the nocking point. Indeed, after changing bow weight the nocking point should always be rechecked.
Fletchings or Vanes: Spinning or Rifling
An arrow should spin like a rifle bullet. This can be achieved by using:
- natural feathers
- giving straight vanes a helical offset (difficult on thin carbon arrows).
- Spin-Wing vanes
- QuikSpin vanes
Nocks
From the Quicks web site: "Changing the nock on the back of the arrow can have a similar effect [to changing point weight. Beiter nocks are heavier than ACE nocks and effectively STIFFEN the arrow compared with ACE nocks. Why tell you this? Well 1999 Easton released a pin nock for the ACE shaft giving greater accuracy and protection from tail ending of shafts. You should be beware that changing to a new nock system can alter the effective stiffness of your ACEs."
Yup, there are many variables... and by far the easiest to change is point weight.
- Using break off points (for ACEs) it is possible to get weights from 60 to 120 grain, in 10 grain steps.
- Buy three 80/90/100 and three 100/110/120 grain points. Put these in six arrows, and mark the arrow to show its point weight.
- Using lipstick, 'paint' the arrow rest and shoot the six arrows.
- Shoot and check for lipstick on the fletchings.
If you change point weight, it is necessary to recheck and re-tune your centre shot, bracing height and button, obviously...
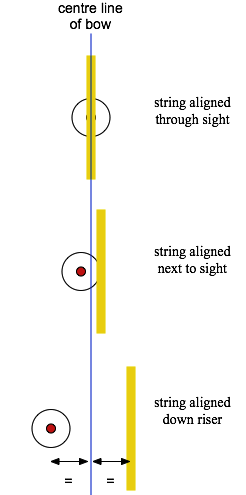
Window & String Picture
String alignment when shooting is crucial to setting up the centre shot of the bow. On the pictures below the vertical blue line is the centre shot and the horizontal blue line is the... horizontal. [Oh yeah, I was shooting a red string at the time I made these images.]
A "open window" occurs when the string is aligned down the riser:

A "closed window" occurs when the string aligns with the sight pin:

When shooting the string appears far more out of focus than on the above images... at least it does for Meta.
(Repeat of what is said above):
- If an archer aligns their string with the sight pin, as the sight pin moves in and out [due to wind or poor centre shot] the string alignment will also change. This may have technique implications as an archer may feel less aligned to the target.
- If an archer aligns their string with the riser of the bow, as the sight moves in and out [due to wind or poor centre shot] the string alignment will NOT change.
Well Tuned Bows Shooting @ 70 Metres
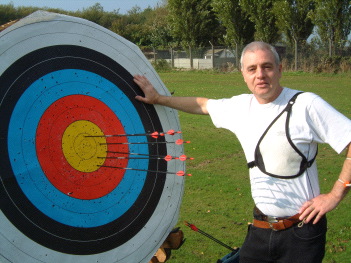
Yet another six gold end for Silverstreak...
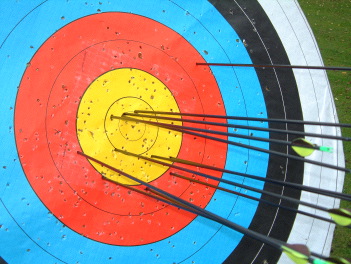
A 108 dozen – with a twitch – at 70 metres for Meta.
The Future
A new form of carbon has been discovered in which the carbon exists in tiny tubes called single walled carbon nanotubes or SWCNTs,
read more on the Wikipedia, here.
- SWCNTs are the lightest, stiffest material known, by a very wide margin.
- Currently, single tubes can now be grown an inch or so long, and I am sure Easton will be very interested when they get to 32 inches.
- Arrows 1mm in diameter anyone?
Recurve Bow Tuning Links
Note that, in this author's opinion, these pages overemphasize button tuning and under-emphasise centre shot and bracing height.
- Basic Bow Tuning by Graeme Jeffrey, Centenary Archers
- Bow Tuning by Southampton University Archery Club
- Principles of Bow/Arrow Tuning by Joe Tapley
- Quicks' Tuning Tips
- Bow Tuning by Steve Ellison
- German Translation of this page
- Bob Kooi's Archery publications
- Some Notes on the Mechanics of Archery
- The general Archer's Reference PDF file (68 pages)
Easton Arrow Selection Tables (Recurve Bows)
Select the spine (stiffness) using an arrow selector chart or software. Easton have developed a web application, available here, but make sure the software is set up for your bow type. There is also a lot of information in the Quicks catalogue which can be viewed as a .Pdf file, here. Ask for advice.
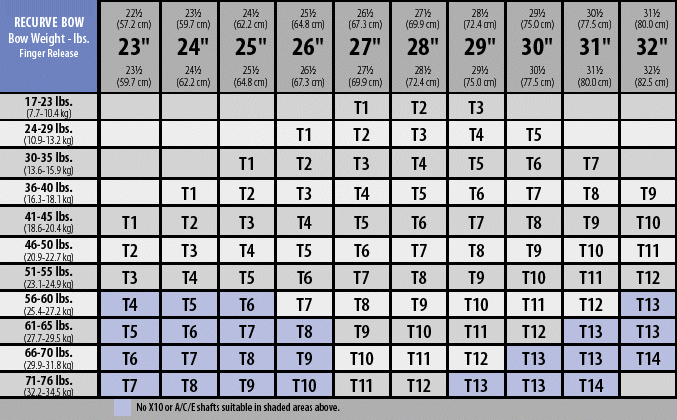
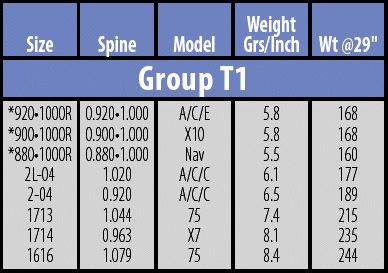
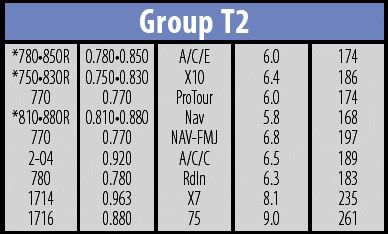
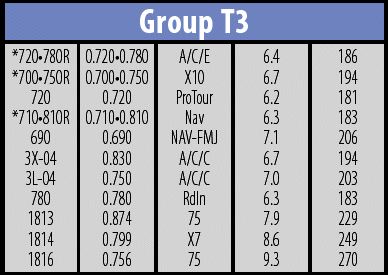
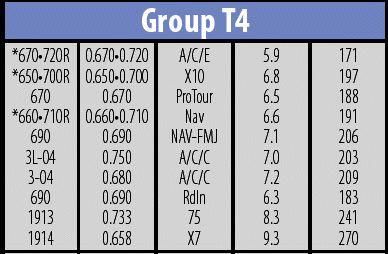
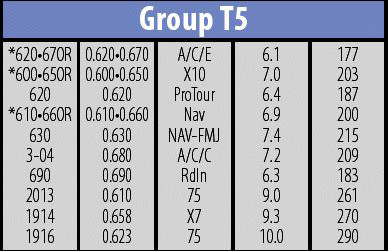
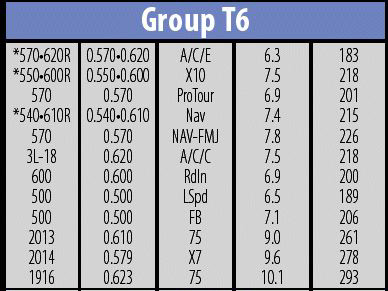
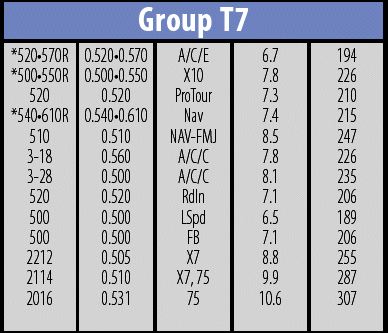

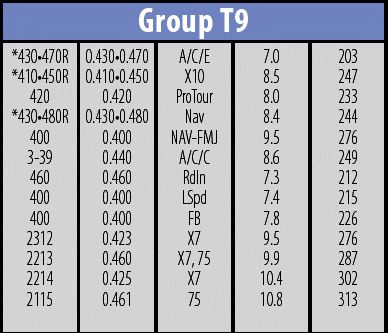
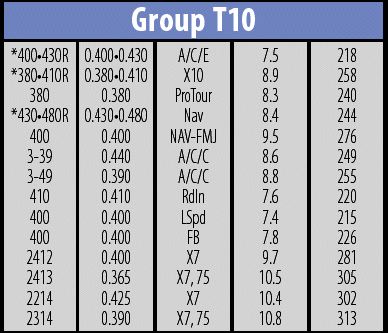
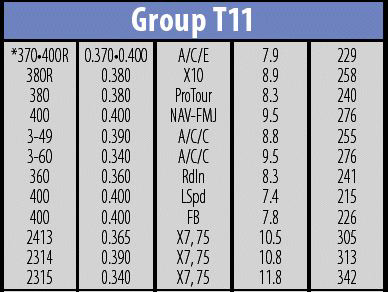
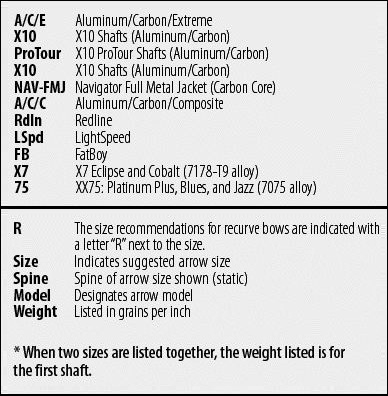
From the 2018 Easton Page:


This graphic, taken from the Easton Arrow Selector page, shows Spine vs. Weight for various types of arrow:
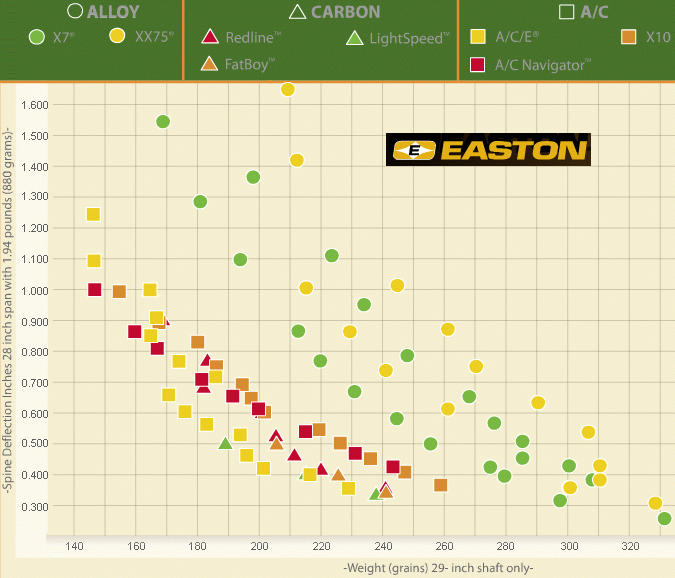
Once you know one type of arrow, read across for arrows of the same or similar spine. Cut to the same length, these arrows should also shoot well from the same bow (after fine tuning).
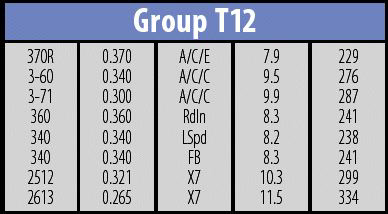
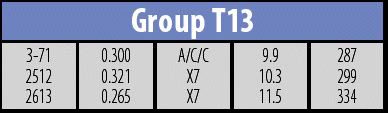
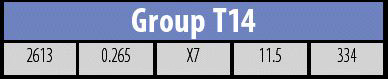
An archer shooting a 29 inch '500 spine' arrow will have the choice of:
- Lightspeed 500
- ACE 520
- ACE 470
- Redline 520
- Fatboy 500
- Redline 460
- X10 500
- Navigator 480
- ACC 3-28 ( = 500)
- Aluminium 2212
- Aluminium 2213
- Aluminium 2114
- Aluminium 2214
- Aluminium 2016
- Aluminium 2115
although it may be necessary to fine-tune the arrow (above). Be aware that thin walled aluminium arrows – 2212, 2213, etc – are rather weak and will not last very long.
If you have any comments, corrections or link suggestions, feel free to contact: Mark Leach of Eccles Archery Club.
© Mark R. Leach 2005 –
Queries, Suggestions, Bugs, Errors, Typos...
If you have any:
QueriesComments
Suggestions
Suggestions for links
Bug, typo or grammatical error reports about this page,
please contact Mark R. Leach, the author, using mark@meta-synthesis.com
This free, open access web book is an ongoing project and your input is appreciated.